In this article, you will learn how to develop an API using Django and the Django rest framework (DRF) library using best practices that ensure greater system longevity and scalability. For this, the development of a simple inventory control system that provides endpoints, a term used to conceptualize the routes so that another application can use the data, will be demonstrated.
Note that, in the relational model of the product that will be explored, each user is linked to a company, which may have several stocks with different batches of products.
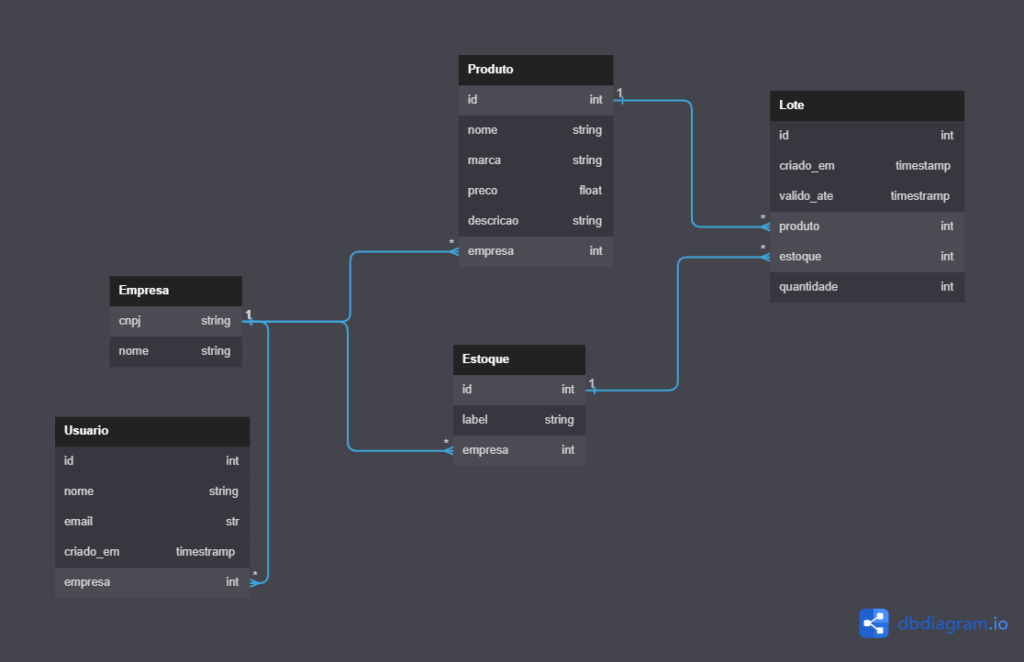
So you can focus on API development, choose to present this repository with the docker file configured to run the project and database with minimal effort.
The requirements to run the project using docker is just to install it and use the command docker-compose up in the command line.
What are APIs?
First, let’s understand what an API is. To understand this concept, one can compare an API to a waiter in a restaurant.
When we access a page (restaurant) we use the menu to choose what to eat, then we call the waiter (API) to send our order to the kitchen (backend) and prepare our food (data). The waiter (API) returns the finished food to the customer when the food is ready.
In this way, the API works as an intermediary between the client and the data or the backend and the frontend. It is important to point out that there are several types of APIs such as GRAPHQL and REST, but specifically in this content we will work with a focus on the development of a REST API, it is its most common structure.
Django Rest Framework - DRF
The Django Rest Framework library is a tool that allows building web APIs very quickly, providing views, serializers, filters, authentication services, and middleware among many other features. Using the base application that will be shown in this article with the models and database already configured, we will start working on our API.
For this, the first point to be considered is: which endpoints will be provided to the user. That is, which actions our API will make available. Looking at the “Company”, “Product” and “Inventory” templates, one can think of some endpoints that will be needed in our program. Are they:
Company
- List Company Information
- Create Company, for authorized users only
- Delete Company, for authorized users only
- Update Company, for authorized users only
Product
- List Product Information
- Create Product, for authorized users only
- Delete Product, for authorized users only
- Update Product, for authorized users only
Stock
- List Stock Information
- Create Inventory, for authorized users only
- Delete Stock, for authorized users only
- Update Stock, for authorized users only
Note that they all have an endpoint for inserting, reading, updating, and removing data. This pattern is called CRUD (Create, Read, Update, Delete). With that said, let’s start working on our visualizations!
It’s important to point out that views should not have business logic or rules. A view API is only responsible for receiving the request, communicating with the rest of the program, and returning a response with data in JSON format.
So that we can transform the database data into a JSON-type response, we are going to use the concept of serialization. The Django Rest Framework provides classes for easy maintenance and reads data serialization. Notice in the image below how the serialization for reading the product data is done using DRF.

Product Serializer class.
This class of type “ModelSerializer” translates the object in the Python language to a dictionary that can be passed as a response. That is done, the next step will be to configure our views and use the serializers we just created.

List and Details Class Methods.
Note that two different views are used for different actions. The get, put, post, and delete methods don’t have to be explicit as in the example, but they make the methods visible and make the class as a whole easier to read and understand.
Knowing that a “generics.ListCreateAPIView” implements several functions in our view, we can expand the “list” method to visualize some of the functionalities.

List Product Method.
Note that the filters are applied to our queryset, as well as the paging and serializer created, are applied to our data.
Having done that, the last step for us to use our endpoint is to configure a route. Here it is worth mentioning that the routes are configured through the urls.py file of each application.

API Routes.
The two routes we created can now be accessed by clicking here.
Done with this whole process, now it is possible to create new products by sending a POST request to this route. For this, we’ll use the Postman tool to make the requests.
As any API testing tool will have the same results it doesn’t matter which one you use. In this case, opt-in for Postman, which is the Reqbin online tool.
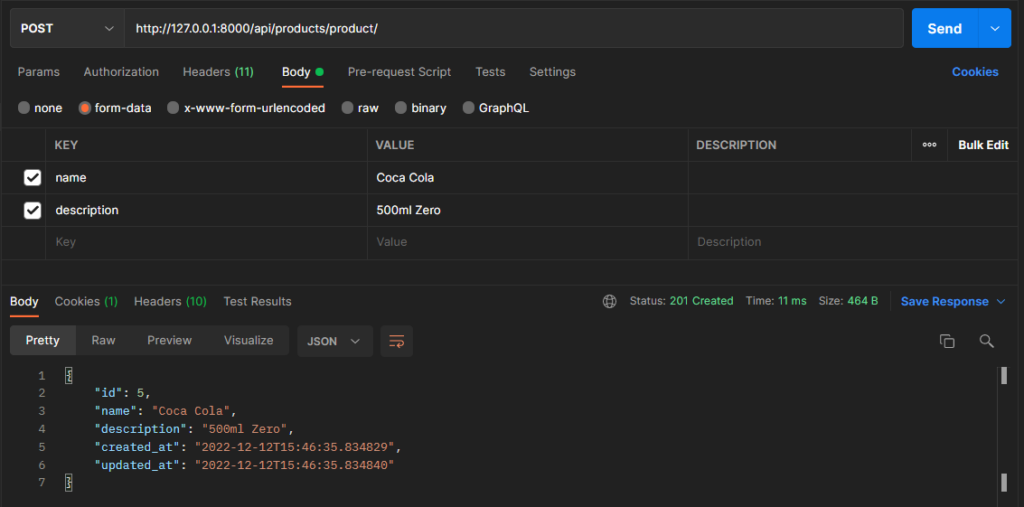
API call example of POST method in Postman.
It is noticed that when making the request, the response 201 Created is received, which signals that an object was created. Once this is done, it is possible to list all objects created by making a GET request on the same route.

Response example for GET method.
To read, change and delete a specific product, the id is added to the route. For this, the name of a product whose id is 1 will be changed.
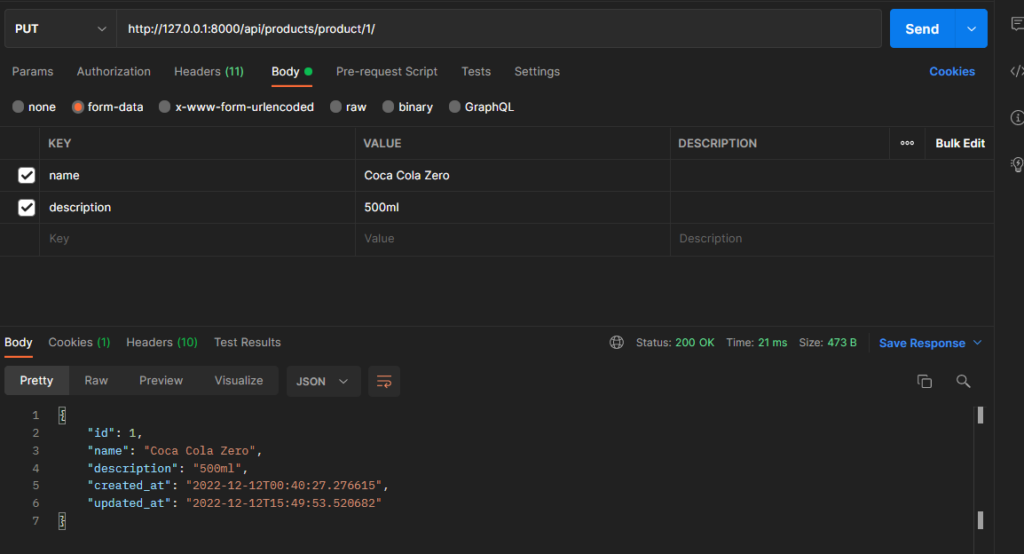
API Call example of a PUT method.
In this way, we can create the CRUD routes that we wrote in the list of necessary routes and our program will be usable. If you wish, click here and access the repository with all implemented routes.
In the indicated repository, it is possible to perceive many implementations. Therefore, we are going to work above the theme of Authentication.
Knowing that DRF provides a class to customize authentication, an authentication method via BearerToken is used. For more information, see the framework documentation here.


Route to authenticate the user.
Through this route, a token is obtained that is passed in each request. Also note here that in serializer.py of the “user” application, the “create” method is replaced and logic is added to associate a client with the user.
The same was done in the BatchUpdateSerializer, located in serializer.py of the product application.
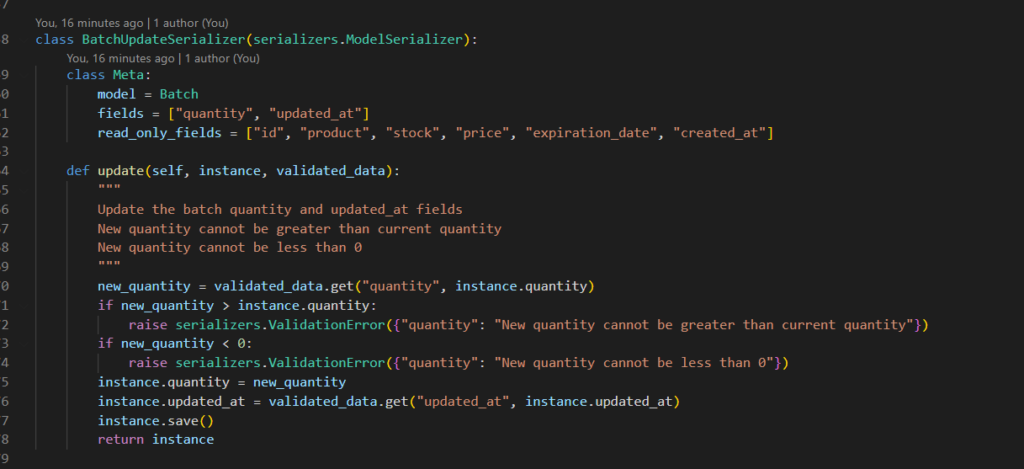
Update serializer field.
Again, it can be seen that it is possible to interrupt the order placed or to change it. It is also feasible to create fields that are not in our model using the SerializerMethodField method in a serializer.

Serializer updated.
In this example, two fields that don’t exist in the template were created in our response.
To finalize our created route, filters can also be implemented in the response according to the so-called query parameters, which can be passed in the request in the format that can be accessed by clicking here.
The “is_expired” parameter is captured and handled in our view in a special “filter_queryset” method. Notice how any parameter can be used to control your response.

Handling the new serializer field.
Another important feature in the image above is the implementation of an inheritance called FilterByCustomerMixin. This inheritance is responsible for filtering the queryset that belongs only to the Customer with whom our User is associated.
It should be noted that it is possible to control the name of the field through “cusomer_lookup_field”.

Filter according to the customer, or user authenticated.
Final thoughts on this matter
Each and every API must be documented. Thinking specifically about Postman, we have provided a StockAPi that can be accessed here.
This material, as well as this article, was written by one of the excellent professionals who make up the BIX Tech team. If you would like to contact him with any questions, please feel free to contact Leonardo on his LinkedIn profile.


